基于STM32G070RB的七彩星空灯教程(二)
上次我们完成了工程的新建,这次我们开始点亮RGB
本文引用地址://www.cazqn.com/article/202205/434254.htm打开我们上次教程生成的代码
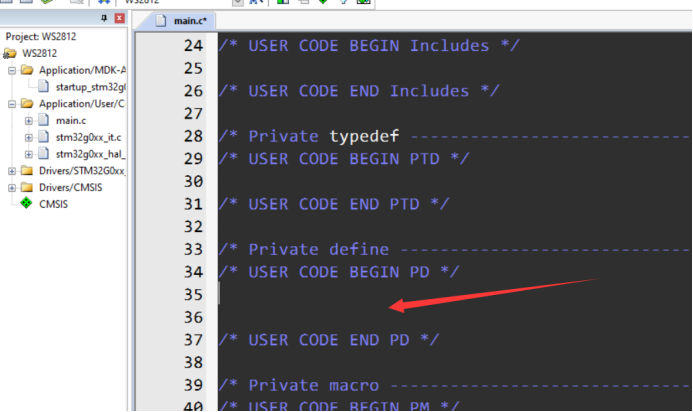
我们打开工程,将一下代码 复制到下图所在位置
#define ONE_PULSE        (59)                           //1 码计数个数
#define ZERO_PULSE       (29)                           //0 码计数个数
#define RESET_PULSE       (80)                          //80 复位电平个数(不能低于40)
#define LED_NUMS         (12)                            //led 个数
#define LED_DATA_LEN     (24)                           //led 长度,单个需要24个字节
#define WS2812_DATA_LEN  (LED_NUMS*LED_DATA_LEN)        //ws2812灯条需要的数组长度
uint16_t static RGB_buffur[RESET_PULSE + WS2812_DATA_LEN] = { 0 };
接下来就是DMA传输完成回调函数(根据你使用的定时器配置),以下函数都复制到main.c 的/* USER CODE BEGIN 4 */代码区
void HAL_TIM_PWM_PulseFinishedCallback(TIM_HandleTypeDef *htim)
{
   HAL_TIM_PWM_Stop_DMA(&htim1,TIM_CHANNEL_1);
}
下面就是今天的最后一步WS2812的驱动函数了,以下函数的作用是根据WS2812的数量将灯的GRB颜色数据写到需要DMA传送的数组中
void WS281x_SetPixelColor(uint16_t n, uint32_t GRBColor)
{
   uint8_t i;
   if (n < LED_NUMS)
   {
      for (i = 0; i < 24; ++i)
      RGB_buffur[24 * n + i] = (((GRBColor << i) & 0X800000) ? ONE_PULSE : ZERO_PULSE);
   }
}
将三个颜色的数据合并成GRB数据
uint32_t WS281x_Color(uint8_t red, uint8_t green, uint8_t blue)
{
   return green << 16 | red << 8 | blue;
}
这是一个简单的颜色渐变算法 ,感兴趣的可以研究研究
uint32_t Wheel(uint8_t WheelPos)
{
   WheelPos = 255 - WheelPos;
   if (WheelPos < 85)
   {
      return WS281x_Color(255 - WheelPos * 3, 0, WheelPos * 3);
   }
   if (WheelPos < 170)
   {
      WheelPos -= 85;
      return WS281x_Color(0, WheelPos * 3, 255 - WheelPos * 3);
   }
   WheelPos -= 170;
   return WS281x_Color(WheelPos * 3, 255 - WheelPos * 3, 0);
}
这里我简单的写了两个演示程序
void Mode2_LED(uint8_t wait)
{
   uint32_t timestamp = HAL_GetTick();
   uint16_t i;
   static uint8_t j;
   static uint32_t next_time = 0;
   uint32_t flag = 0;
   if (next_time < wait)
   {
      if ((uint64_t)timestamp + wait - next_time > 0)
         flag = 1;
   }
   else if (timestamp > next_time)
   {
      flag = 1;
   }
   if (flag)
   {
      j++;
      next_time = timestamp + wait;
      for (i = 0; i < LED_NUMS; i++)
      {
         WS281x_SetPixelColor(i, Wheel((i + j) & 255));
      }
   }
   HAL_TIM_PWM_Start_DMA(&htim1,TIM_CHANNEL_1,(uint32_t *)RGB_buffur,RESET_PULSE + WS2812_DATA_LEN);
}
void Mode1_LED(uint8_t wait)
{
   uint32_t timestamp = HAL_GetTick();
   uint16_t i;
   static uint8_t j;
   static uint32_t next_time = 0;
   static uint8_t loop = 0;
   if (loop == 0)
      next_time = timestamp;
   loop = 1; //首次调用初始化

   if ((timestamp > next_time)) // && (timestamp - next_time < wait*5))
   {
      j++;
      next_time = timestamp + wait;
      for (i = 0; i < LED_NUMS; i++)
      {
         WS281x_SetPixelColor(i, Wheel(((i * 256 / (LED_NUMS)) + j) & 255));
      }
   }
   HAL_TIM_PWM_Start_DMA(&htim1,TIM_CHANNEL_1,(uint32_t *)RGB_buffur,RESET_PULSE + WS2812_DATA_LEN);
}
在主函数中直接调用Mode1_LED和Mode2_LED函数即可。
OK 到这里就结束了,点亮之后相当炫酷。,大家可以借鉴 ,修改出自己独特的风格。


评论